
1. 웹 어플리케이션(Web Application)이란?
웹 어플리케이션은 웹환경을 통해 서비스를 제공하는 프로그램을 말합니다. 예를 들면 웹브라우저(예를 들어 크롬)에서 메일을 주고 받거나 게시물에 댓글을 남기는 것들은 웹 어플리케이션에 의해 수행됩니다.
웹 어플리케이션은 웹 어플리케이션 서버(Web Application Server; WAS)에 의해 실행됩니다. 앞서 웹서버에 의해 정적 페이지 생성이 가능하다고 했는데 웹 어플리케이션 서버는 웹 어플리케이션을 통해 동적 페이지 생성이 가능합니다. 물론 웹서버도 php 같은 서버 사이드 언어를 통해 동적 페이지 생성이 가능하고 웹 어플리케이션 서버도 정적 페이지 생성이 가능합니다.
2. MPA와 SPA
MPA(Multi Page Application)는 여러개의 페이지로 구성된 어플리케이션을 말하고 SPA(Single Page Application)는 하나의 페이지로 구성된 어플리케이션을 말합니다.
출처: Microsoft Developer Network
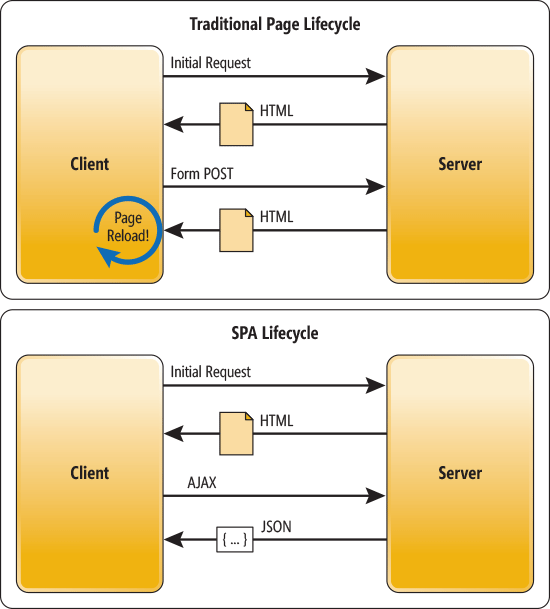
MPA는 전통적인 웹 애플리케이션 개발 방식이며, php 같은 서버 사이드 언어를 통해 완성된 HTML 문서를 응답 받습니다. 서버에서 렌더링하여 첫 로딩이 짧고 SEO(Search Engine Optimization)에 유리하지만 요청마다 전체 페이지를 갱신하기 때문에 불필요한 리소스 낭비가 발생합니다.
SPA는 최근 많이 사용하는 웹 애플리케이션 개발 방식이며, 최초 요청에서만 HTML 문서를 응답 받고 그 이후에는 AJAX를 통해 필요한 데이터만 요청하여 JSON 형식으로 응답 받습니다. 페이지 전체를 갱신할 필요가 없기 때문에 화면 전환이 빠르고 불필요한 리소스 낭비가 없지만 클라이언트에서 렌더링 하기 때문에 초기 로딩이 느리고 SEO에 불리합니다. 그러나 구글 크롤러의 경우 자바스크립트 엔진을 사용하여 SEO가 잘됩니다.
3. Node.js
Node.js는 크롬 V8 자바스크립트 엔진으로 빌드된 자바스크립트 런타임입니다. 런타임이란 실행 환경을 말합니다. 즉, Node.js란 쉽게 말해서 자바스크립트가 실행되는 환경입니다. 이전에는 자바스크립트 런타임이 웹 브라우저(예를 들어 크롬)밖에 존재하지 않았지만 크롬 엔진을 통해 브라우저 밖에서도 자바스크립트를 실행할 수 있도록 만든 것입니다. 이벤트 기반 비동기 방식이기 때문에 서버에 무리가 적으며 npm이라는 자체적인 패키지 매니저가 있어서 효율성이 좋습니다. 또한 자바스크립트 언어이기 때문에 쉽게 접근 가능합니다.
4. 실습
여태껏 설명한 것을 응용하여 실습 해보겠습니다.
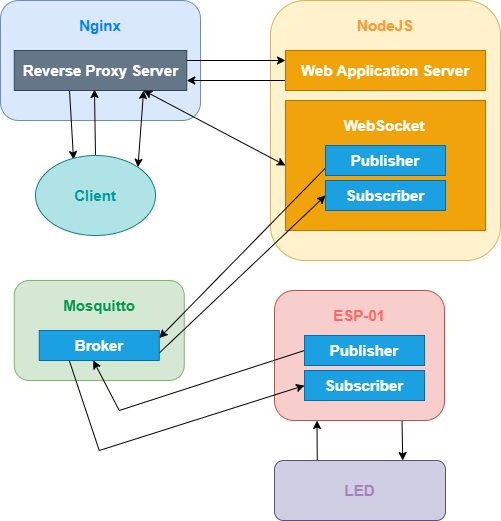
* nginx는 라즈베리파이에서 리버스 프록시 서버로 사용하며 80번 포트를 사용합니다.
* Nodejs는 라즈베리파이에서 웹 애플리케이션 서버와 웹소켓 서버로 사용하며 30001번 포트를 사용합니다. * Mosquitto는 라즈베리파이에서 MQTT 브로커로 사용하며 1883번 포트를 사용합니다.
* LED는 ESP-01 RX핀으로 제어하며, ESP-01에는 Tasmota 펌웨어를 올려 MQTT 통신을 합니다.
웹소켓에 있는 MQTT 클라이언트에 의해 ESP-01과 정보를 주고 받으면서 클라이언트와 양방향 통신을 하여 실시간으로 LED 상태를 반영합니다.
우선 라즈베리파이에 로그인합니다.
업데이트를 합니다.
$ sudo apt update && sudo apt upgrade |
nginx부터 설정하겠습니다. 설치는 https://www.robotstory.co.kr/raspberry/?board_name=raspberry_bbs&order_by=fn_pid&order_type=desc&vid=40를 참고하세요.
설정파일을 편집합니다. $ sudo nano /etc/nginx/sites-available/default |
모두 지우고 다음과 같이 작성합니다.
nginx와 nodejs가 같은 기기(라즈베리파이)에서 실행되므로 ip주소는 로컬ip 127.0.0.1을 적습니다. server { listen 80; location / { proxy_pass http://127.0.0.1:30001/; proxy_http_version 1.1; proxy_set_header Upgrade $http_upgrade; proxy_set_header Connection "upgrade"; } } |
리버스 프록시 서버가 되어 80포트로 오는 요청을 30001포트로 전달합니다. Ctrl + O를 눌러 저장하고 Ctrl + X를 눌러 빠져나오세요.
다음 명령어를 입력하여 nginx를 재시작합니다. $ sudo service nginx restart |
다음으로 mosquitto를 설치합니다. 도커에 설치하겠습니다. 도커 설치법은 https://www.robotstory.co.kr/raspberry/?board_name=raspberry_bbs&order_by=fn_pid&order_type=desc&vid=32를 참고하세요.
우선 컨테이너와 연결할 설정파일을 만들고 편집합니다.
$ mkdir /home/pi/mosquitto && nano /home/pi/mosquitto/mosquitto.conf |
다음과 같이 작성합니다.
listener 1883 allow_anonymous true |
Ctrl + O를 눌러 저장하고 Ctrl + X를 눌러 빠져나오세요.
다음 명령어로 mosquitto 컨테이너를 생성합니다.
$ docker run -d --name=mosquitto --restart=always -p 1883:1883 -v /home/pi/mosquitto/config/mosquitto.c onf:/mosquitto/config/mosquitto.conf eclipse-mosquitto |
다음으로 esp-01에서 mqtt를 설정하겠습니다. Tasmota 펌웨어를 올리는 방법은 https://www.robotstory.co.kr/raspberry/?board_name=raspberry_bbs&order_by=fn_pid&order_type=desc&vid=35를 참고하세요. LED는 RX핀으로 제어하도록 설정했습니다.
esp-01 ip주소로 들어갑니다. 설정 메뉴 > MQTT 설정으로 들어갑니다. 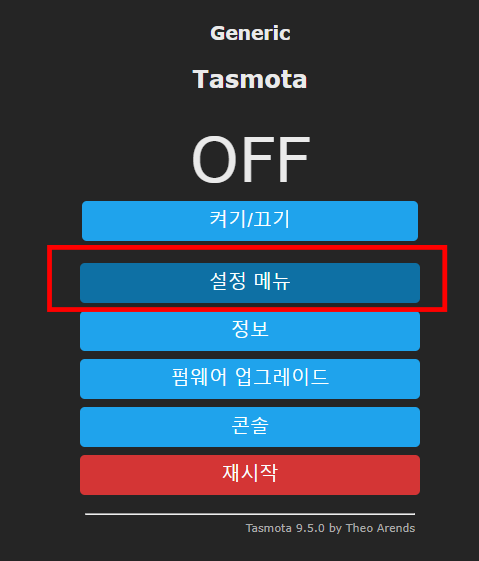
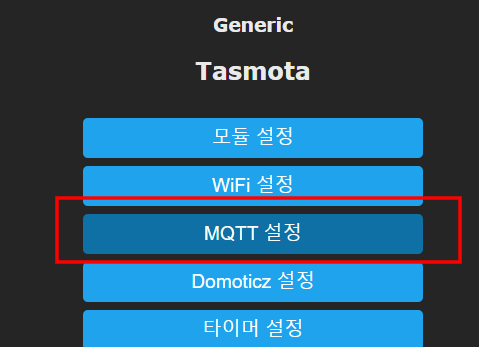
호스트에는 브로커가 있는 라즈베리파이 ip 주소, Topic은 tasmota, Full Topic은 %prefix%/%topic%/를 적어주고 저장을 누릅니다. 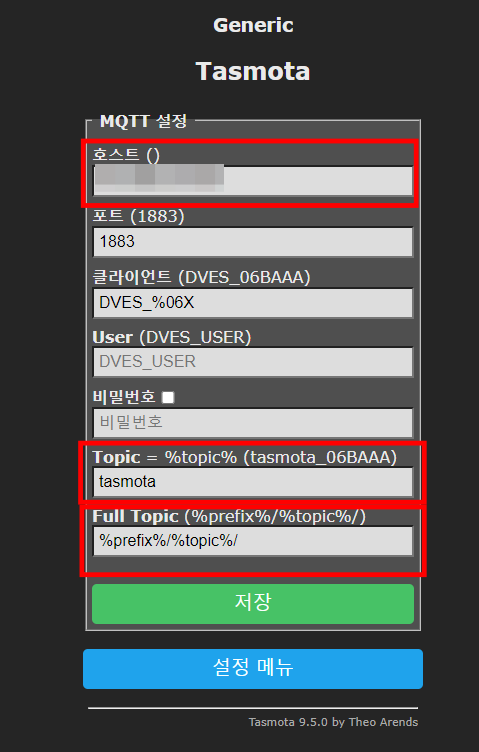
다음으로 nodejs로 웹서버를 만들겠습니다. nodejs와 npm을 설치합니다.
$ sudo apt install nodejs npm |
서버 폴더를 만듭니다.
$ mkdir /home/pi/{node-server,node-server/html} |
서버 폴더로 이동합니다. $ cd /home/pi/node-server |
서버 파일을 만듭니다.
$ touch app.js html/{index.html,default.css,script.js} |
was는 express라는 웹서버 모듈을 사용하도록 하겠습니다.
websocket은 ws 모듈, mqtt는 mqtt 모듈을 사용합니다. npm을 이용하여 express, ws, mqtt를 설치해주세요.
서버 파일을 편집합니다.
다음과 같이 작성합니다. nodejs와 mosquitto가 같은 기기(라즈베리파이)에서 실행되므로 MQTT_SERVER_IP는 로컬ip 127.0.0.1을 적습니다.
const express = require('express'); const wsModule = require('ws'); const mqtt = require('mqtt');
// *** Web Application Server Create
const app = express(); const MQTT_SERVER_IP = '127.0.0.1'; const SERVER_PORT = 30001;
app.use(express.static(__dirname + '/html'));
app.use((req, res) => { res.status(404).send('Not Found'); });
const HTTPServer = app.listen(SERVER_PORT, () => { //console.info(`Server is running on ${SERVER_PORT} port`); });
// ****************************
// *** MQTT Client Create
const mqtt_client = mqtt.connect(`mqtt://${MQTT_SERVER_IP}`); const PUBLISH_TOPIC = 'cmnd/tasmota/POWER'; const SUBSCRIBE_TOPIC = 'stat/tasmota/POWER'; let status = '';
mqtt_client.on('connect', function () { mqtt_client.subscribe(SUBSCRIBE_TOPIC, {qos: 1}); });
// ****************************
// *** WebSocket Create
const webSocketServer = new wsModule.Server({server: HTTPServer}); let clients = [];
mqtt_client.on('message', (topic, msg) => { for (let client of clients) { if (client.readyState === client.OPEN) { client.send(msg.toString().toLowerCase()); } } });
webSocketServer.on('connection', (client, req) => {
const ip = req.headers['x-forwarded-for'] || req.connection.remoteAddress;
clients.push(client); mqtt_client.publish(PUBLISH_TOPIC, '', {qos: 1});
//console.info(`Enter the new client: ${ip}`);
client.on('message', (msg) => { try { if (msg.toString().toLowerCase() == 'on') { mqtt_client.publish(PUBLISH_TOPIC, 'on', {qos: 1}); } else if (msg.toString().toLowerCase() == 'off') { mqtt_client.publish(PUBLISH_TOPIC, 'off', {qos: 1}); } } catch (err) { //console.error(err); client.send('error'); } });
client.on('error', (err) => { //console.error(`Client ${ip} connection error: ${err}`); });
client.on('close', () => {
const idx = clients.indexOf(client);
if (idx != -1) { clients.splice(idx, 1); }
//console.info(`Client ${ip} connection has been closed.`); }); }); |
Ctrl + O를 눌러 저장하고 Ctrl + X를 눌러 빠져나오세요.
다음으로 html 파일을 편집합니다.
다음과 같이 작성합니다.
<!doctype html> <html lang="ko"> <head> <meta name="viewport"content="width=device-width,initial-scale=1,user-scalable=no"/> <meta http-equiv="Content-Type" content="text/html; charset=utf-8"> <title>WiFi 컨트롤</title> <link href="/default.css" rel="stylesheet" type="text/css" /> <script src="/script.js" defer></script> </head> <body> <CENTER> <h2>WiFi 컨트롤</h2> <p>스위치</p> <button id = "switch" class="unknown">UNKNOWN</button> </CENTER> </body> </html> |
Ctrl + O를 눌러 저장하고 Ctrl + X를 눌러 빠져나오세요.
다음으로 스타일시트 파일을 편집합니다.
다음과 같이 작성합니다.
button {border: 0; border-radius: 0.3rem; background: #858585; color: #faffff; line-height: 2.4rem; font-size: 1.2rem; -webkit-transition-duration: 0.4s; transition-duration: 0.4s; cursor: pointer;} button.unknown {pointer-events: none;} button.off {background: #1fa3ec;} button.off:hover {background: #0e70a4;} button.on {background: gold;} button.on:hover {background:#ddba01;} CENTER > * {width: 250px;} |
Ctrl + O를 눌러 저장하고 Ctrl + X를 눌러 빠져나오세요.
다음으로 자바스크립트 파일을 편집합니다.
다음과 같이 작성합니다. 웹소켓 IP 주소는 웹소켓이 실행되는 라즈베리파이 IP주소(또는 도메인 주소)를 적어주세요.
const btn = document.getElementById('switch'); let webSocket; const socketInit = () => {
webSocket = new WebSocket("ws://웹소켓 IP 주소");
webSocket.onmessage = (e) => { if (e.data == 'on') { btn.className = "on"; btn.innerText = "ON"; } else if (e.data == 'off') { btn.className = "off"; btn.innerText = "OFF"; } }
webSocket.onclose = () => { btn.className = "unknown"; btn.innerText = "UNKNOWN"; setTimeout(socketInit, 300); }
btn.onclick = () => { if (btn.className == 'on') { webSocket.send('off'); } else if (btn.className == 'off') { webSocket.send('on'); } } }
socketInit(); |
다음으로 pm2 패키지를 설치합니다. pm2는 Process Manager의 약자로 말그대로 프로세스를 관리해주는 도구입니다. nodejs를 백그라운드에서 관리하면서 서버가 죽어버리면 다시 실행시켜줍니다. 라즈베리파이가 재부팅되면 서버를 자동으로 실행시킬 수도 있습니다.
pm2로 서버를 실행합니다.
$ pm2 start /home/pi/node-server/app.js |
라즈베리파이 재시작시 자동 실행을 위해 다음 명령어를 입력합니다.
다음과 같이 실행해야할 명령어가 나옵니다. 복사해서 명령어를 실행시켜주세요. 
다음과 같은 메시지가 나오면 pm2 save를 입력하여 저장해줍시다. 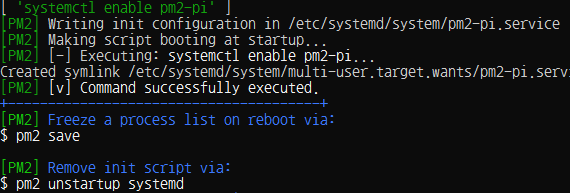

이제 웹브라우저(크롬)에서 라즈베리파이 ip주소를 치고 들어가보세요! 3개의 브라우저 모두 실시간으로 상태가 변하는 것을 볼 수 있습니다.
|  스팟
스팟