
이번 글에서는 integration을 통해 패널을 생성해보도록 하겠습니다.
커스텀 컴포넌트 폴더로 이동하여 example_panel 폴더를 생성하세요.
$ cd /usr/share/hassio/homeassistant/custom_components && sudo mkdir example_panel |
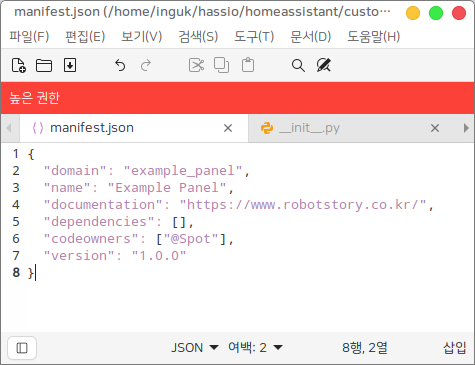
설정파일(manifest.json)을 다음과 같이 작성합니다.
$ sudo xed manifest.json |
{ "domain": "example_panel", "name": "Example Panel", "documentation": "https://www.robotstory.co.kr/", "dependencies": [], "codeowners": ["@Spot"], "version": "1.0.0" } |
컴포넌트 파일(__init__.py)을 다음과 같이 작성하세요.
"""Example Panel Component"""
from __future__ import annotations
from homeassistant.core import HomeAssistant from homeassistant.helpers.typing import ConfigType
DOMAIN = "example_panel" SIDEBAR_TITLE = "예제 패널" ICON = "mdi:leaf"
PATH_BASE = f"/{DOMAIN}_files" PATH_JS = f"{{}}/custom_components/{DOMAIN}/js" PATH_PANEL = f"{PATH_BASE}/example-panel.js"
async def async_setup(hass: HomeAssistant, config: ConfigType) -> bool:
# js 파일 경로 설정 hass.http.register_static_path( PATH_BASE, PATH_JS.format(hass.config.config_dir), cache_headers=False)
# 패널 설정 if DOMAIN not in hass.data.get("frontend_panels", {}): hass.components.frontend.async_register_built_in_panel( component_name="custom", sidebar_title=SIDEBAR_TITLE, sidebar_icon=ICON, frontend_url_path=DOMAIN, config={ "_panel_custom": { "name": "example-panel", "embed_iframe": False, "trust_external": False, "module_url": PATH_PANEL, }, }, require_admin=True, )
return True |
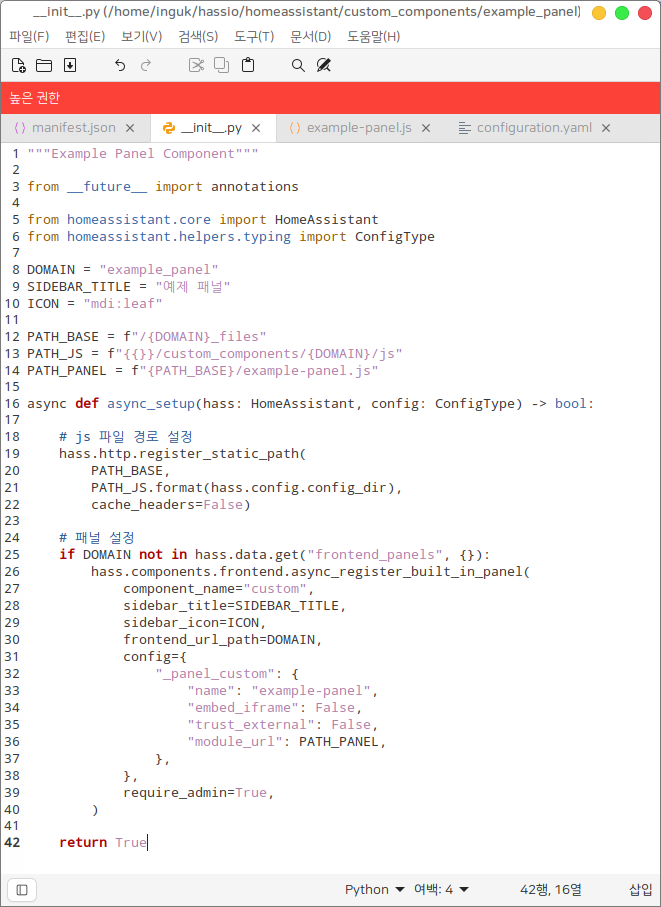
의존성 모듈을 import하고 상수를 설정합니다.
from __future__ import annotations
from homeassistant.core import HomeAssistant from homeassistant.helpers.typing import ConfigType
DOMAIN = "example_panel" SIDEBAR_TITLE = "예제 패널" ICON = "mdi:leaf"
PATH_BASE = f"/{DOMAIN}_files" PATH_JS = f"{{}}/custom_components/{DOMAIN}/js" PATH_PANEL = f"{PATH_BASE}/example-panel.js" |
integration이 로드시 setup 함수가 실행됩니다. setup 함수를 정의하세요. 비동기로 실행하고 싶으면 async_setup 함수를 비동기 함수로 정의하면 됩니다.
async def async_setup(hass: HomeAssistant, config: ConfigType) -> bool:
|
폴더 경로를 URL 경로로 설정하기위해 홈어시스턴트 객체에서 register_static_path 함수를 실행합니다. 매개변수로 URL 경로, 폴더 경로를 넘겨줍니다. cache_headers를 False로 하면 경로 설정시 캐시가 생성되지 않습니다.
# js 파일 경로 설정 hass.http.register_static_path( PATH_BASE, PATH_JS.format(hass.config.config_dir), cache_headers=False) |
PATH_BASE는 "/example_panel_files", PATH_JS는 "{root_path}/custom_components/example_panel/js" 이므로 웹브라우저에서 url 경로 /example_panel_files로 접속하면 {root_path}/custom_components/example_panel/js 폴더에 접근하게 됩니다.
다음으로 패널 정보를 입력하겠습니다. 홈어시스턴트 객체의 data 필드에서 frontend_panels 키에는 패널정보가 입력되어 있습니다. 각 패널 객체는 패널 URL을 키값으로 하여 딕셔너리 형식으로 저장됩니다. 여기서는 패널 URL을 도메인(example_panel)으로 설정하겠습니다. 즉, example_panel이라는 URL을 가지는 패널 객체가 없으면 홈어시스턴트 객체의 async_register_built_in_panel 함수를 통해 패널 정보를 등록해야합니다. component_name은 "custom", sidebar_title은 패널 이름, sidebar_icon 패널 아이콘, frontend_url_path은 패널 URL, config는 웹 컴포넌트 정보를 입력합니다. 웹 컴포넌트는 html의 구성요소(element)를 컴포넌트 단위로 작성한 것을 말하는데 자세한 설명은 차후 하도록 하겠습니다. name은 웹 컴포넌트 이름, embed_iframe은 iframe 사용 여부, trust_external은 외부 접근 허용 여부, module_url은 모듈 파일(.js) 경로를 입력합니다.
# 패널 설정
if DOMAIN not in hass.data.get("frontend_panels", {}): hass.components.frontend.async_register_built_in_panel( component_name="custom", sidebar_title=SIDEBAR_TITLE, sidebar_icon=ICON, frontend_url_path=DOMAIN, config={ "_panel_custom": { "name": "example-panel", "embed_iframe": False, "trust_external": False, "module_url": PATH_PANEL, }, }, require_admin=True, ) |
웹브라우저에서 url 경로 /example_panel 에 접속하면 example-panel 이라는 웹 컴포넌트가 만들어집니다. 이 웹 컴포넌트는 {root_path}/custom_components/example_panel/js/example-panel.js 모듈 파일에 작성되어 있습니다.
integration이 성공적으로 로드되었음을 알리기 위해 True 값을 리턴합니다.
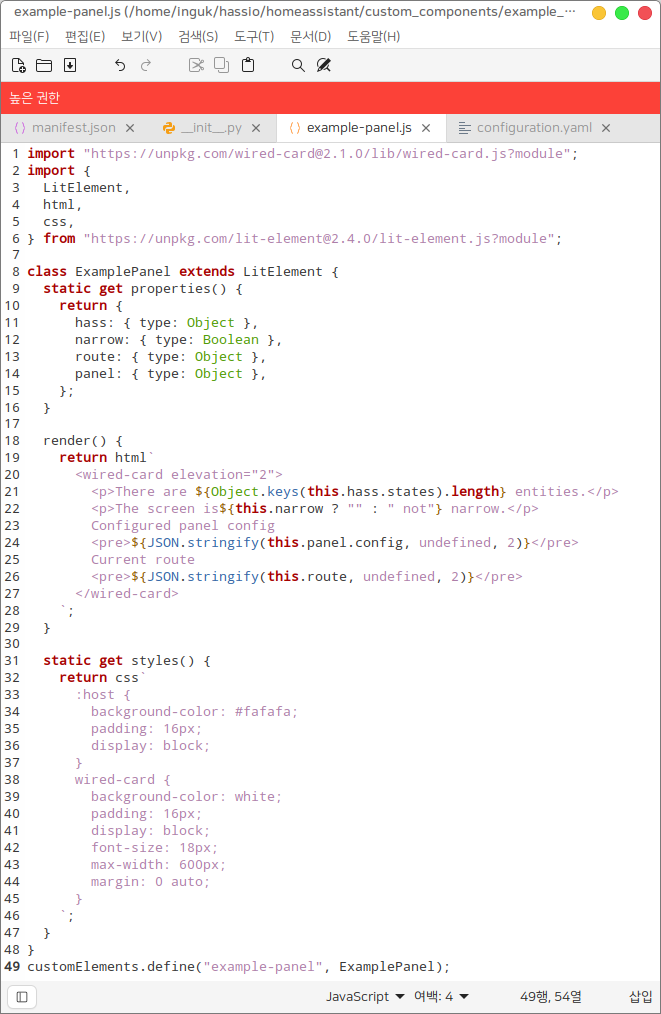
다음으로 웹 컴포넌트 모듈 파일을 작성하겠습니다. 홈어시스턴트 공식 frontend는 구글의 Lit 라는 라이브러리를 통해 웹 컴포넌트 모듈을 작성합니다. frontend 작성에 대해서는 추후 설명하도록 하고 예제로 다음과 같이 작성해주세요.
$ sudo mkdir js && sudo xed js/example-panel.js |
import "https://unpkg.com/wired-card@2.1.0/lib/wired-card.js?module"; import { LitElement, html, css, } from "https://unpkg.com/lit-element@2.4.0/lit-element.js?module";
class ExamplePanel extends LitElement { static get properties() { return { hass: { type: Object }, narrow: { type: Boolean }, route: { type: Object }, panel: { type: Object }, }; }
render() { return html` <wired-card elevation="2"> <p>There are ${Object.keys(this.hass.states).length} entities.</p> <p>The screen is${this.narrow ? "" : " not"} narrow.</p> Configured panel config <pre>${JSON.stringify(this.panel.config, undefined, 2)}</pre> Current route <pre>${JSON.stringify(this.route, undefined, 2)}</pre> </wired-card> `; }
static get styles() { return css` :host { background-color: #fafafa; padding: 16px; display: block; } wired-card { background-color: white; padding: 16px; display: block; font-size: 18px; max-width: 600px; margin: 0 auto; } `; } } customElements.define("example-panel", ExamplePanel); |
configuration.yaml 파일에 도메인을 입력해줍시다.
$sudo xed ../../configuration.yaml |

저장하고 홈어시스턴트 메인화면에서 구성하기 > 서버 제어 > 다시 시작하기 를 누릅니다.
새로고침을 누르시면 왼쪽 사이드바에 "예제 패널" 이라는 타이틀을 가지는 패널이 생성되어 있습니다. 아이콘은 홈어시스턴트에 내장된 mdi:leaf 아이콘입니다. 해당 패널을 클릭하면 /example_panel url경로에 접속되며, example-panel 웹 컴포넌트가 로드됩니다. 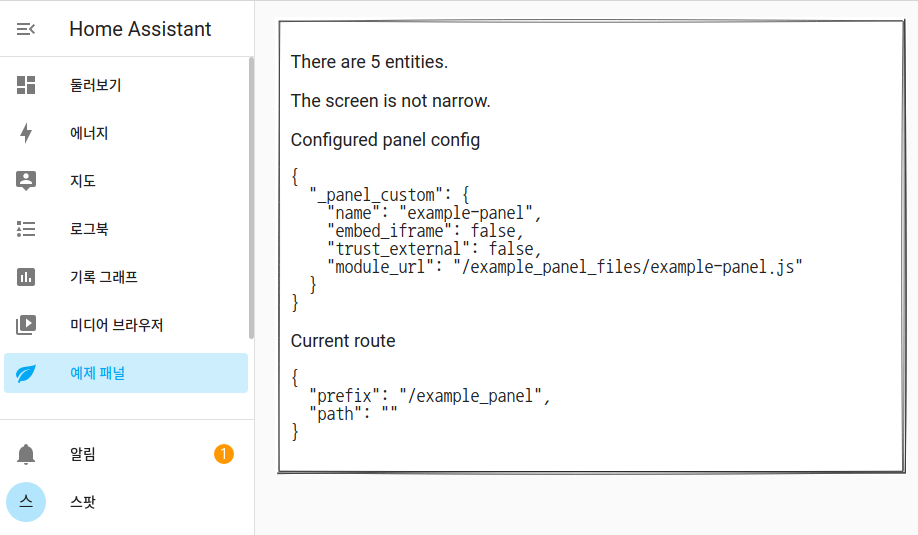
|
 스팟
스팟